Saturday, September 1, 2012

Coffee Sleeve Mini Album


I love Starbucks; Venti One-Shot Skinny Vanilla Latte - that's my standard drink and the one the barista usually starts making as soon as I approach the counter. They know me well at my local Starbucks, and I'm happy to have made many friends while visiting there.  So it's probably no surprise that I have a TON of coffee sleeves, and when the opportunity came to partner with someone for a swap using these little lovelies, I jumped at the chance. Here's the project I finally completed for my friend Sara. I used Prima's Nature's Garden collection - oh how these papers make my heart sing! There are oodles and oodles of goodies to play with; gorgeous paper, flowers, wood pieces, die cuts, journaling tags...the possibilities are endless. I think I may have to hoard the leftovers (no surprise there either...lol)

Here's a peek at some of the pages. Thanks for stopping by. Enjoy your day!


Tuesday, August 28, 2012

A Little Sneaky Peeky.....


I had so much fun making this little coffee sleeve mini album for a swap over at MAS. I can show the entire album once my swap partner receives it. I sure hope she likes it! 


Saturday, August 25, 2012


Oh how time flies! I left a part of my heart in Pennsylvania today. My sweet Mandy headed off for college yesterday and we moved her into her dorm today. She has grown into a lovely independent, strong young woman and we love her so much. I'll miss her but am happy that she is excited (and hopefully well prepared) to embark on this new adventure. I used the My Creative Scrapbook July kit for this layout - it's filled with lovelies from the Carta Bella "Beautiful Moments" collection. I love the rich colors and all the fun images that are ripe for fussy cutting.


Friday, August 10, 2012

Collaged Chipboard Tutorial

Here's a recap of a quick tutorial I posted on the Be Yourself Creations blog today on how to make collaged chipboard stars. 


Collaged Chipboard Technique:
 I don't know about you, but I always cringe when I'm faced with "naked" chipboard! I have mists and paints and such in my stash, but I'm addicted to patterned paper so I always prefer to use it as often as possible. Here's what I did to make the stars...

Gather your supplies:

"naked" Chipboard 
patterned paper scraps (little bits and pieces are fine to use)
liquid adhesive (one that dries clear is crucial)
craft knife & self-healing mat
Sanding tool
ink for edges 


Cover the chipboard completely with liquid glue


Begin adding scraps of paper to chipboard. Do not over think this - just grab a scrap and stick it down. It doesn't matter if it overlaps other pieces - just stick it down!


contine covering...


 When you're finished your chipboard should be unrecognizable! Let it dry completely.


Spread a small amount of liquid glue over the entire piece. Make sure you're using glue that dries clear! Let the entire piece dry completely before going to the next step


Turn the chipboard over and using your craft knife, cut the excess paper away


Your chipboard should look like this now:


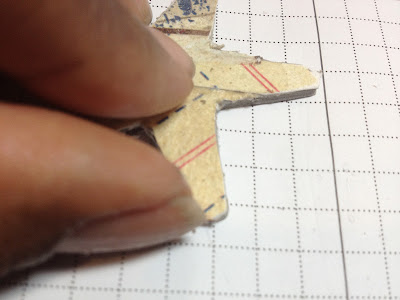
Now you can begin sanding the edges. I always make sure the edges are flush to the chipboard. 


Check to make sure that the edges are not "lifting"..if they are, even a little bit, use a tiny amount of glue to keep them down


When the top coat of glue is dry and you are sure the edges are down completely, begin inking around the corners.


Ta-da! You're all done! Your star should look something like this now...isn't it cute?


And here it is on the project. I added a smaller star from the same package on top of this one on my final cover


I hope this helps! Enjoy your weekend.

Authentique Mini Album

Oh how I love this paper line - Authentique Glory; Filled with nostalgia and has me feeling very patriotic, especially with the Olympics winding down soon. Here's a little mini I made for Be Yourself Creations, my sweet friend Terri's new store. Be sure to visit her blog too!

As always, thanks for stopping by today!


Wednesday, August 1, 2012

Pocket Tags...

These little cuties were made for my friend Kerry-Jo who I met through the Mini Album Swaps group. The tags are close to a standard 6 inches and I added my pockets to the front.  The pockets hold smaller tags and minis. I used the August kit from C'est Magnifque Kit Club, which afforded me the opportunity to play with the beautiful Vintage Summer line from Maja Designs. These papers are absolutely GORGEOUS (my photos don't do them justice).  They have a vintage romantic feel and are classy shabby-chic. The kit I used also contained the lovely ephemera pack from the Pink Paislee London Market collection - beautiful imagery on these pieces. And of courseI had to add a few flowers; what's life without flowers, right? Thanks for stopping by today!


Monday, June 4, 2012